Blog Archives
Krazy for Kimchi
For the past few years, I’ve been experimenting with lacto-fermentation. The name is somewhat deceiving because despite the “lacto” in its name, no dairy products are required to get started.
Lacto-fermentation is a microbial process carried out by naturally occurring bacteria which are considered to be beneficial to our digestive systems (i.e. probiotic). Lactobacillus (from which lacto-fermentation gets its name) is one strain of lactic-acid bacteria. Lactic acid bacteria occur on the surface of most plants, especially those growing close to the ground. Lactic acid bacteria thrive in an anaerobic environment (one without oxygen), an environment where harmful bacteria are less likely to grow.
Lacto-fermentation starts with a brine, the first step in creating the necessary anaerobic environment. The salt in the brine kills off the harmful bacteria which cannot tolerate the salty environment. In addition, tightly-packed product deprives aerobic bacteria of oxygen so it starts to die off. Anaerobic bacteria eliminate oxygen in the jar through the production of carbon dioxide. That’s why we don’t do lacto-fermentation in a sealed jar. The gas needs to escape and without an outlet, the jar would simply explode.
The remaining lactobacillus convert sugars in the food to lactic acid. The lactic acid lowers the pH. The acidic environment further inhibits the growth harmful bacteria. It’s also perfect for preserving the food. Lactic acid provides the distinctive tang present in lacto-fermented foods.
My lactofermentation adventures started two years ago when I succeeded in making batch after batch of sour pickles. I also dabbled with some kimchi. This fall, after a lifetime of detesting sauerkraut, I came to the realization that I might actually like it. In a backward way of thinking, sauerkraut is nothing more than a non-spicy version of European kimchi.
A few weeks ago, my CSA share included a head of Napa cabbage so I decided it was time to make a batch of kimchi. I can’t say how authentic this version is, but I can say that it is relatively easy, uses readily available ingredients (at least where I live) and, needing to ferment for only a few days, provides a quick path to gratification.
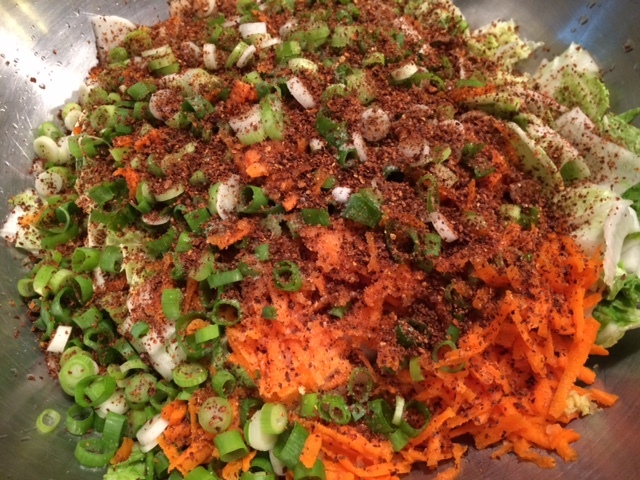
The first step is to draw some of the moisture out of the Napa cabbage. Before you start chopping, reserve one leave of the cabbage to use later. Then chop the leaves into bite-sized squares, about 2 inches, and also thinly slice a daikon radish, and halve or quarter it if the daikon is fat.

Let the vegetables sit in brine overnight. Note that chlorine can inhibit the bacteria needed by the fermentation process, so if you use chlorinated tap water, take the time to let the water sit out for a few hours to allow the chlorine evaporate. If you are new to pickling, also note that it is important to use non-iodized salt. Iodine, which is added to most table salt, inhibits the pickling process. Morton’s sells a product called “Canning and Pickling Salt” which I’ve bought locally at Roche Brothers. Kosher and sea salt are also iodine-free though you might need to adjust the quantity to get the right level of saltiness in your brine.
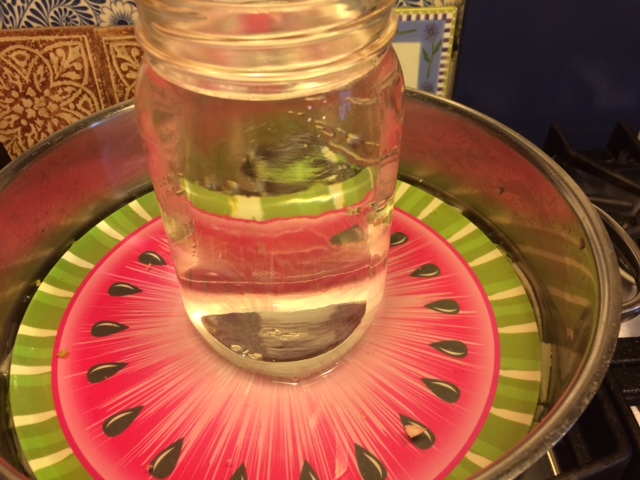
You will want to weight down the cabbage as it soaks to keep it covered. Use a plate topped with a jar of water.
The next day, drain the cabbage, but RESERVE THE BRINE!!! We’re going to use it again.
Toss the softened cabbage and daikon with shredded carrots and the aromatics – ginger, garlic, scallions, and Korean chili flakes (gochugaru). Pack the kimchi mixture into a large clean canning jar, preferably wide-mouthed. Really pack it in! I use a wooden drink muddler, but take a look around your kitchen. A wooden spoon or anything else long that fits through the mouth of your jar will work. I have a set of half-gallon Ball jars that are perfect for fermentation projects. You could also divide the mixture between two of the more readily available 1-quart size.
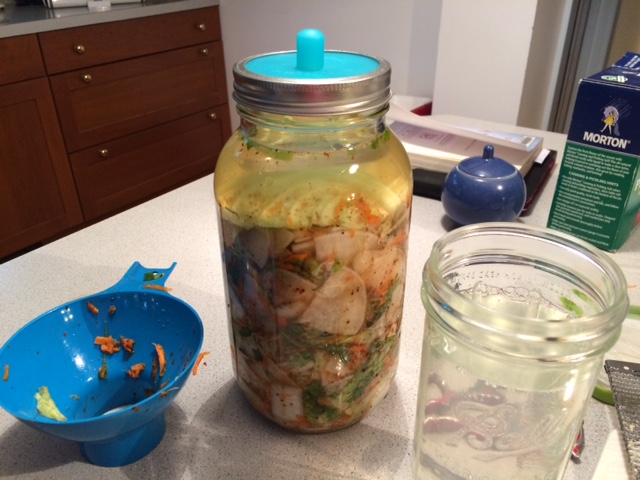
Finally, cover the kimchi with the reserved brine. If you still have some left, save a cup or two in the refrigerator. I find that the liquid in the jar sometimes evaporates so I use the extra to top it off. It is important to keep the vegetables completely covered to keep out bacteria in the air which might cause spoilage.
You’ll also see that the vegetables tend float to the top. To deal with this, cut a circle out of that reserved cabbage leaf. Fit it into the top of the jar, tucking it underneath the shoulders of the jar to keep it in place. You also want to weight down the vegetables in the jar. The best low-tech method I’ve found for this is to use a small (1-cup) canning jar filled with brine. This works to both hold down the vegetables and minimize the air that gets into the jar. Alternatively, you could use a Ziplock bag filled with brine. Some people use an airlock to allow carbon dioxide from the fermentation process out of the jar while keeping air from getting into the jar, but I’ve had repeated success with the simple the “jar in the top”.
Admittedly, I’m going a bit fancier this year. Last fall, I came across a Kickstarter campaign for MasonTops. For fun, I invested (my first Kickstarter participation)! I received a set of Pickle Pipes (waterless airlocks made of silicone) and a set of Pickle Pebbles (glass fermentation weights) as my reward. I’ve been using them since March, and they work great!
The kimchi typically needs to ferment for 3-6 days. Place the jar on a plate because sometimes the liquid overflows. It’s best to let it sit somewhere cool. In my house that’s the basement. More than anything else I’ve fermented, kimchi seems to be the smelliest, so somewhere out of the way is good for that reason too. However, don’t completely forget about it. Check the level of the brine once a day. If it falls below the level of the vegetables, top it off with the brine I had you save before.
The length of time needed will depend on a variety of factors, most importantly your tastebuds but also the ambient weather (my house isn’t air-conditioned, so on hot summer days, the process goes faster). I recommend you start tasting it after 3 days, and let it go until you’re happy with how sour it is. At that point, consider it “done”. Put a lid on the jar, and place it in the refrigerator where the fermentation will stop, but the kimchi will last a long time. Some say months, but we were eating from the last jar I made for almost two years.
I love kimchi as a condiment, but I have a Pinterest board with ideas on using it as an ingredient.
Here’s my kimchi recipe. If you try it yourself, let me know how it goes. I’m not an expert, but I am happy to answer questions based on my experiences. If the fermentation bug bites you, check back because I plan to share my recipe for sour pickles in the next few weeks. I’ve already made three batches from the pickling cucumber plants in my garden!
Simple Kimchi
Makes 2 quarts
10 cups water
5 Tbsp + 1 tsp pickling salt (non-iodized)
1½ pounds head Napa cabbage
1 pound daikon, peeled
1 carrot, peeled and grated
1½ Tbsp fresh ginger, minced
1½ Tbsp garlic, minced
1 bunch scallions, cut in thin slices (I use both the white and green parts)
2-3 Tbsp Korean chili flakes (gochugaru)
1½ tsp sugar
1½ tsp pickling salt (non-iodized)
Make brine: Add 5 Tbsp + 1 tsp salt to the water, and stir well to completely dissolved.
Prep Vegetables: Reserve one leaf of the cabbage. Cut the Napa cabbage lengthwise into quarters. Core each quarter, and cut into 2-inch squares. Slice the daikon in half lengthwise. If the daikon is especially fat, slice it again lengthwise (into quarters). Then slice the lengths thinly crosswise. In a large bowl or pot, toss the cabbage and daikon together. Cover them with the brine. Using a plate just smaller than the bowl, weight them down and let them soak in the brine at room temperature overnight (8-12 hours). If the plate tends to tilt or float, place a glass jar filled with water on top of the plate to hold it down.
Drain the cabbage and daikon. RESERVE THE BRINE! Do not rinse. Return the vegetables to the bowl and toss well with the remaining ingredients.
Tightly pack the mixture into the jar(s). Try not to go above the shoulders of the jar. Really pack it in. Now pour the reserved brine into the jar, covering the mixture. Stop about ½-inch from the top of the jar. Cut a circle out of the reserved cabbage leaf, and fit it into the jar top. Weight down the kimchi in the jar with a smaller jar or Ziplock bag of brine (or an airlock). If you still have extra brine, reserve 1-2 cups and store in the refrigerator in case you need it later.
Place the jar on a plate in case of overflow. Place the jar of kimchi in a cool place (under 70F is ideal, but might not be possible in summer). Let it ferment for 3-6 days, or until you like its taste. Check the level of the liquid daily, replenishing with reserved brine as needed.
Taste it daily after 3 days. When you’re happy with it, cover with a tight lid and store in the refrigerator. Fermentation will stop.
Sources for Lacto-Fermentation explanation:
Pickl-It website
Cultures for Health
About Food Preservation
