Blog Archives
Candied Sunshine #fijchallenge

Two years ago, I started the Food in Jars Mastery Challenge, a yearlong challenge to broaden and improve my preservation skills. For no obvious reason, I only made it through March. When I saw that Marisa was running another challenge this year, I decided to jump on board again. I have no idea how long I’ll last, but, for the moment, I have good intentions.
January’s challenge is to play with preserving citrus. The technique is open-ended. I’ve always wanted to candy my own citrus rind. Candied orange rind is a confection I love to use in baking all year long added to scones, shortbread, and baseler leckerli at the holidays. I’ve always bought it commercially made, but when I’ve seen recipes, it seems like an achievable DIY kitchen project.
I also love repurposing kitchen scraps into delicious things to eat. This time of year, Howard eats a lot of oranges, and we both eat grapefruit for breakfast every morning. I asked Howard to set aside some of his orange rinds plus I saved grapefruit rinds for a few days to support a parallel experiment.
In the meantime, I researched recipes. Some recipes only used the outer peel, discarding the pith, while others used the whole rind. The candied peel I buy uses the whole thing which is also much less work and less waste so that’s the approach I chose.
There were many different methods for preparing the rind for candying. Some cut the rind into strips first. Others started with halves of rinds – in some cases with any membranes to be scraped off later and others already “clean”. I was concerned the strips would get overcooked, so decided to start with the larger pieces and cut them into strips afterwards. The orange rinds were already cleaned and the grapefruits were not, so I decided to try both ways to compare.

There were also many different approaches for boiling the rind. In all cases, the purpose is to remove bitterness. The variety came in the timing: how long and how many times? In some recipes, you simply bring the peel and water to a boil then immediately draining and repeating. Other recipes, the rind is boiled for 2 minutes, 3 minutes, anywhere up to 15 minutes before repeating. And how many times? I saw recommendations between 2 and 5 times.
The strength of the simple syrup was also variable, but most frequently it was 1:1 (water to sugar).
Armed with these ideas, I set out to make one batch of candied orange peel and another of candied grapefruit peel. The only difference between my chosen method for the different batches was that the grapefruit still had all the membranes attached.
If you are making candied peel from fruit you’ve juiced and you’re trying to keep things as simple as possible, doing the boiling step with those membranes still attached seems like the path of least resistance. However, I found that after the rinds were softened from the cooking, it was difficult to get down to the pith. I used the serrated edge of a grapefruit spoon to scrape, but it never seemed like I got all the membrane off. In retrospect, I wish I’d cleaned the rinds at the start.
Everything else was simple enough. Time consuming, but manageable if you’re hanging around the kitchen anyway.
The candied orange peel is amazing. It’s far superior to anything I’ve bought. I might be making more before the winter citrus season is over.
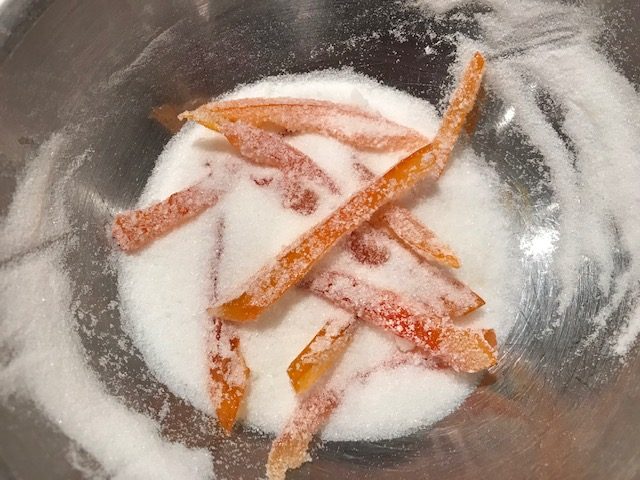
On the other hand, the candied grapefruit peel has a bitter finish. In an attempt to counter the bitterness, I coated the grapefruit peel with sugar. The coating gives the peel an attractive look and cuts the stickiness when handling it. However, the bitterness persisted. Maybe grapefruit, being naturally more bitter than orange, needed more rounds of boiling to mellow? I’m hoping that I can still use it in baking so it won’t be wasted. I’ll try some of my recipes that use candied orange or lemon peel to see.
Candied Citrus Peel
- Rinds from 2 oranges, quartered
- 1½ cups water
- 1½ cups sugar
For coating candied rind, 1 cup sugar (optional)
If any of the membrane from the fruit remains, scrape or pull it away from the inside of the rind.
Place the rind in a medium saucepan and cover with cold water. Bring to a boil. Let boil for 3 minutes. Drain. Repeat 2 more times. This reduces the bitterness of the rind’s pith.
After the final (3rd) boil/drain cycle, let the rind cool until it’s comfortable to handle. This will take 10-20 minutes. Slice rind into ¼ inch strips, no longer than 3 inches.
Wash the pot to reuse for making simple syrup. Bring the water to a boil. Add the sugar to the pot. Turn off the heat and stir until the sugar dissolves.
Note: If you think your fruit is especially small or large or you are scaling this recipe up or down, at this point, do a rough measure of the strips of rind in a liquid measuring cup. Calculate 75% of the volume of rind (round up to the closest ¼ cup so it’s easy to measure). Make a simple syrup from the calculated amount of water and the same amount of sugar. My 2 orange rinds (from average-sized fruit) yielded 2 cups of rind strips, so I made simple syrup from 1½ cups water and 1½ cups sugar.
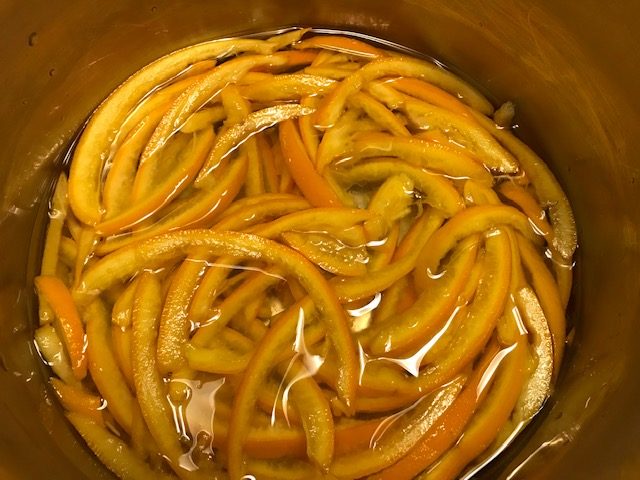
Add the rind strips to the simple syrup and bring to a boil. Reduce the heat, and simmer, stirring occasionally, until the peel is soft and translucent, 45 minutes to an hour. The rind will absorb most of the syrup, and water will evaporate from the syrup so it will thicken as it cooks. Towards the end, you can turn up the heat slightly to accelerate evaporation. Don’t let it burn.
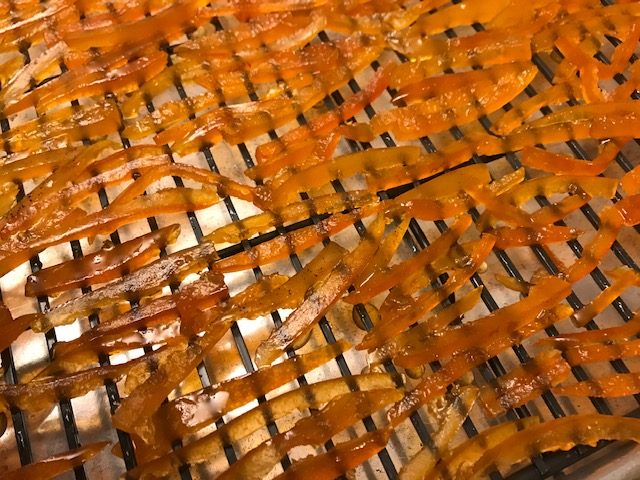
Place a cooling rack over a baking sheet. Using forks, transfer the candied strips to the rack to cool and dry. Separate the strips so they aren’t clumped. (You can save the concentrated syrup to add to seltzer or to sweeten your tea.)
Once the rind is cool, cover it lightly with a clean tea towel or paper towels to keep it clean (it’s sticky). Let it sit for 1-2 days to dry, though it will remain a little tacky.
Optionally, after drying overnight (8 hours), toss the rind in white sugar. Do this in small batches to avoid clumping. Transfer the coated rind to a rack set over a baking sheet (don’t use the original one without wiping it clean – it’s sticky!) and let it dry further for another day.
Transfer candied rind to an airtight container. It should last 3 to 6 months.
Yield: Filled a 1-quart glass jar
Holiday Treat Wrap-Up

It’s hard to believe that the frenzy of the holiday season is over. I’m still cruising on a sugar high. It’s time to come down soon, but first we have to finish off the dwindling supply of sweets.
It’s been my tradition for a decade or more to make an assortment of treats to share with friends. The whole process is one of my favorite parts of the holidays. First, there’s choosing what to make. I usually mix old favorites with some new recipes. I also enjoy figuring out the right balance of cookies, candies, and nuts. Then, there’s the actual cooking, stirring up a whirlwind of sugar in the kitchen. Plus, there’s packaging everything up in a festive and inviting way, and, finally, delivering the packages to the people that made my year a special one.
Then, we repeat the process, usually with a different assortment, for Howard’s colleagues for him to bring when he returns to the office after New Years.
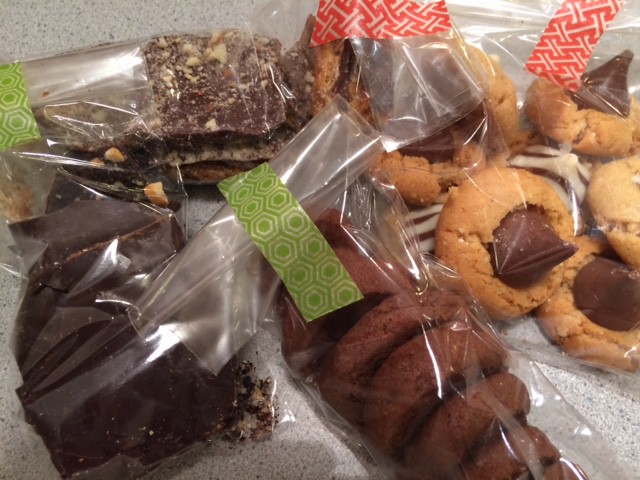
For my friends’ packages, I made two kinds of cookies, some sweet and salty nuts, and chocolate bark.

Round 1
For cookies, first up, I tried Speculoos from Dorie Greenspan’s newest book, Baking Chez Moi. These spice cookies are rolled into logs for slice-and-bake cookies, my favorite technique, though to be honest, I preferred the rolled out version I’ve made from her Around My French Table.
I also chose another cookie recipe from an unlikely source, the out-of-print China Moon Cookbook. A long time ago, at my library’s book sale, I bought a signed copy of this book from a Chinese bistro that was once located in San Francisco, but I’ve never made a single recipe from it. It’s the dessert chapter that always tempts me with a variety of small cookies and luscious sounding tarts, all much more bistro-like than Chinese. The recipe for chocolate stars was calling to me, though my star cookie cutter wasn’t small enough, so I made snowflakes instead. These chocolate shortbread cookies were delightful. Cocoa powder made the dough chocolaty and the chopped dark chocolate gave an added burst of chocolate flavor. Even for this non-chocoholic, this recipe is a winner.
I always like to include some kind of nuts for snacking. The Maple-Thyme Pecans in the new Ovenly cookbook, from the bakery in Brooklyn, were tempting. I made one batch with pecans and another with walnuts. With the second batch, I cut back on the amount of maple syrup to avoid the soupy puddle left in the pan with the first batch. The sweet from the maple was nicely countered by the herbal tones of the thyme and the saltiness of coarse sea salt.
Finally, I took inspiration from David Tanis’ One Good Dish and made some Espresso Hazelnut Bark. This was as simple as topping melted bittersweet chocolate with chopped toasted hazelnuts, crushed coffee beans, and flaky Maldon sea salt.
For packaging, I thought I had bought wintery gift bags at the end of last year’s holiday season, but I couldn’t find them. I used paper lunch bags which I rubber-stamped with snowflakes and tied them close with white yarn.

For the individual items, I fill clear candy bags and typically seal them with our sealer. This year, I did something more interesting. Early in December, I was searching the internet to re-find a white felt wreath I’d seen, but couldn’t remember where. My search brought me to a new (to me) website, White Gunpowder. Though the felt wreath project I found on Kay and Bill’s blog wasn’t what I was looking for, I did discover lots of inspiring new packaging ideas. They were also having a giveaway for an assortment of their favorite packaging supplies. Miraculously, I won!

Packaging supplies I won from White Gunpowder
For this year’s holiday packages, I used the decorative tape to close up the bags. The colorful tape added festive color, plus made the bags easier to open and reseal. I’ll continue to enjoy playing around with the assorted bags, twine, ribbon, and tape that came in my package from White Gunpowder. You should check out their site when you get a chance.
For the New Year’s reprise for Howard, he wanted to go with an all-chocolate theme (his favorite flavor). We repeated the espresso hazelnut bark complemented by Karen’s Cracker Candy topped with chopped almonds (which we’ve nicknamed Toffee Crunch) and World Peace Cookies. To round things out, Howard wanted to include Peanut Blossoms, the peanut butter cookies with a Hershey’s kiss pressed into the top. A nostalgic favorite, I hadn’t made them since I was in high school, though I have sampled them on holiday cookie platters, just not at my house. I used the cookie dough recipe I found on Liz’s site, but baked the cookies a little longer and did not return the pan to the oven after pressing in the kiss (the candy melted too much). I located the gift bags in time for this set, and we used the decorative tape again to seal the individual treat bags.
Round 2
Overall, this was the perfectly sweet way to end one year and bring in the new. I won’t tell you how many pounds of butter I went through! I will say that I see lots of soup simmering on the horizon to help push the diet back on track to more healthy eating.
If you still feel like indulging, you can follow links above or here are a few of the recipes I made that are not already on-line.
1 lb bittersweet chocolate (I used a “Pound Plus” bar of Trader Joe’s 54% Dark Chocolate)
½ cup hazelnuts
½ oz coffee beans
1 tsp Maldon flaked salt
Preheat the oven to 400F. Toast the hazelnuts for 10-15 minutes, until skin is very dark. Rub the hazelnuts in a dishtowel to remove the skins. Coarsely chop the hazelnuts. Set aside to cool.
Place the coffee beans in a ziplock bag. Use a rolling pin to crush the beans.
Line a baking sheet with foil.
Coarsely chop about 80% of the chocolate. Chop the remainder a bit finer. In the microwave, melt the coarsely chopped chocolate. (Start with 1 minute on full power, stir, then heat at 50% power in 30 second increments, stirring after each burst, until completely melted.) Immediately stir in finely chopped chocolate until it melts completely. This tempers the chocolate which gives it a nice sheen when it cools.
Use an offset spatula to spread the melted chocolate to cover the baking sheet. Sprinkle with the chopped hazelnuts, then the coffee beans, then the flaked salt. Lightly press the toppings so they adhere to the chocolate. Chill until firm. Cut or break into pieces.
Chocolate Shortbread Cookies
Makes 4 dozen 2-inch cookies
½ cup (1 stick) cold unsalted butter, cut into 8 pieces
½ cup sugar
½ tsp vanilla extract
1 cup all-purpose flour
¼ cup unsweetened cocoa powder
1/8 tsp fine sea salt
1/8 tsp baking soda
½ cup finely chopped bittersweet chocolate (1/8-inch bits)
In the bowl of an electric mixer, cream the butter and sugar on medium speed until smooth and light, 3 to 4 minutes. Add the vanilla, flour, cocoa, salt, baking soda, and chocolate bits, and mix until well blended, about 2 minutes. Gather the dough into a ball and flatten slightly.
Dust a large piece of parchment paper with flour. Place the dough in the center. Place another piece of parchment on top. Roll out the dough to an even ¼-inch thickness. Refrigerate rolled-out dough until firm, about 1 hour.
Preheat the oven to 350F. Line large baking sheets with parchment.
Using a 2-inch cookie cutter, cut out cookies. Place ½ inch apart on the baking sheets. Reroll scraps and cut more shapes.
Bake until the cookies are firm enough at the edges to slide easily off the parchment, 12 to 15 minutes. The cookies will be soft but will crisp up as they cool. Cool on the baking sheets set on wire racks.
Notes:
- I used the 72% dark chocolate from Trader Joe’s.
- The recipe called for making stars, but my star-shaped cutters are 3-inch or larger. I have 2-inch snowflake cutters, so that’s what I used. I was going for size over shape. The 2-inch size is perfectly bite-sized.
- When I rerolled the scraps, I did not chill the dough again.
