A Slice of Memories
One of my husband Howard’s best memories is living around the corner from the Gourmet Ghetto in Berkeley, California back in the eighties. The primary fixture in that food lovers’ neighborhood was (and still is) The Cheese Board, a cheese store/bakery cooperative that sells an amazing array of cheese and bakes fabulous breads and pastries. Howard’s favorite thing to come out of the bakery was the cheese bread. Whenever we pass through the area, we stop for a fix of cheese bread and cheese.
Because we live on the East Coast, stopping by The Cheese Board isn’t a frequent occurrence. To satisfy the cheese bread craving, I’ve come up with a homemade version that Howard says comes close to what he remembers. It’s easy enough that I try to make at least once a month.
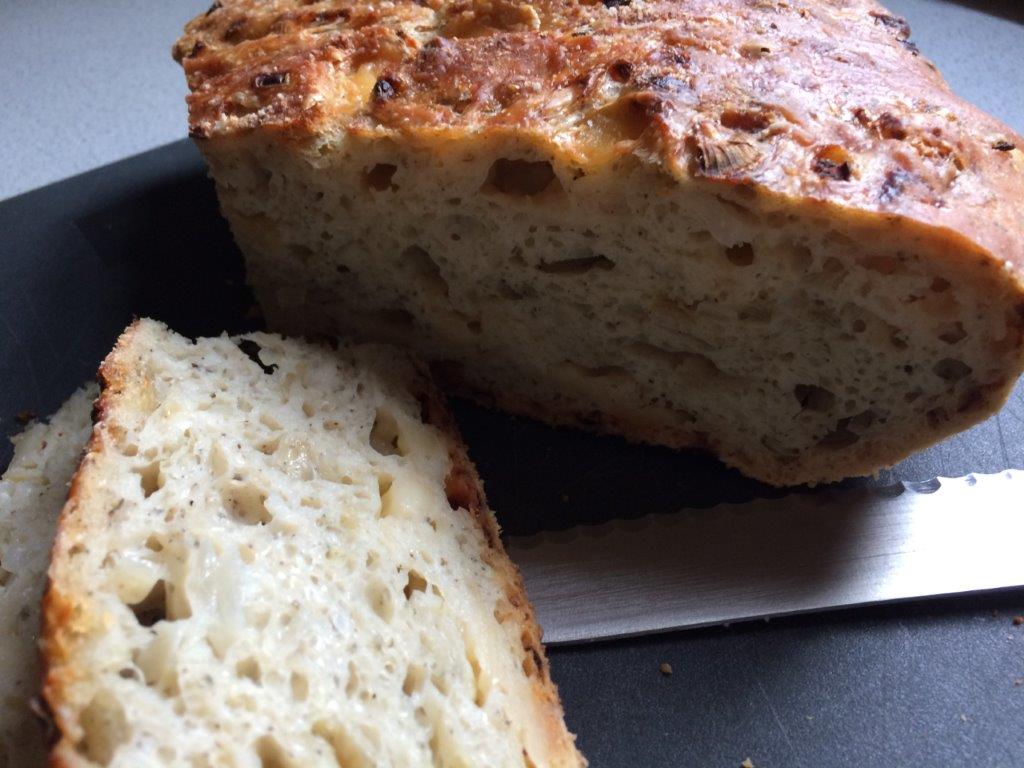
This time of year, slices of cheese bread are the perfect accompaniment to a bowl of soup for lunch or dinner. The crusty outside, speckled with flecks of almost-burnt cheese, contrasts with the soft inside, studded with more pockets of tangy cheese. The floral aroma of marjoram adds a lovely savory element.
Give it a try. If you ever visited Berkeley, you might be transported. If you didn’t, I still guarantee you a bread you’ll want to eat again and again.
No-Knead Cheese Bread, inspired by the Cheese Board in Berkeley
Adapted from Jim Lahey’s No Knead Bread and The Cheese Board’s cookbook.
(Note that I use a scale, but I’ve included approximate volume measurements.)
400 g (about 3 cups) bread flour
½ – 1 tsp fine sea salt (depending on how salty the cheese is)
¾ tsp yeast
2 tsp dried marjoram
½ tsp freshly ground black pepper
1 onion, diced
200g Asiago cheese, diced into ½-inch pieces
About 360 g (about 1-5/8 cups) water
2 Tbsp sesame seeds (to top the loaf before baking)
In a large bowl, whisk together the flour, yeast, salt, marjoram, and pepper. Add onion and cheese and stir to evenly distribute them throughout the dry mixture.
Slowly add water, stirring to combine, until you have a fairly wet dough where all the water is incorporated. You might not need all the water, or you might need a little more. I stir in about half of the water, then another half of what’s left, then judge how much more I need.
If the bowl is really sticky, transfer to a clean bowl. Cover the bowl with a clean dish towel and set in a draft-free spot. (I sometimes use my microwave or the oven.) Let it rise 12-18 hours. It can go a little longer if that suits your schedule better. The dough will rise, get bubbly, and remain very sticky.

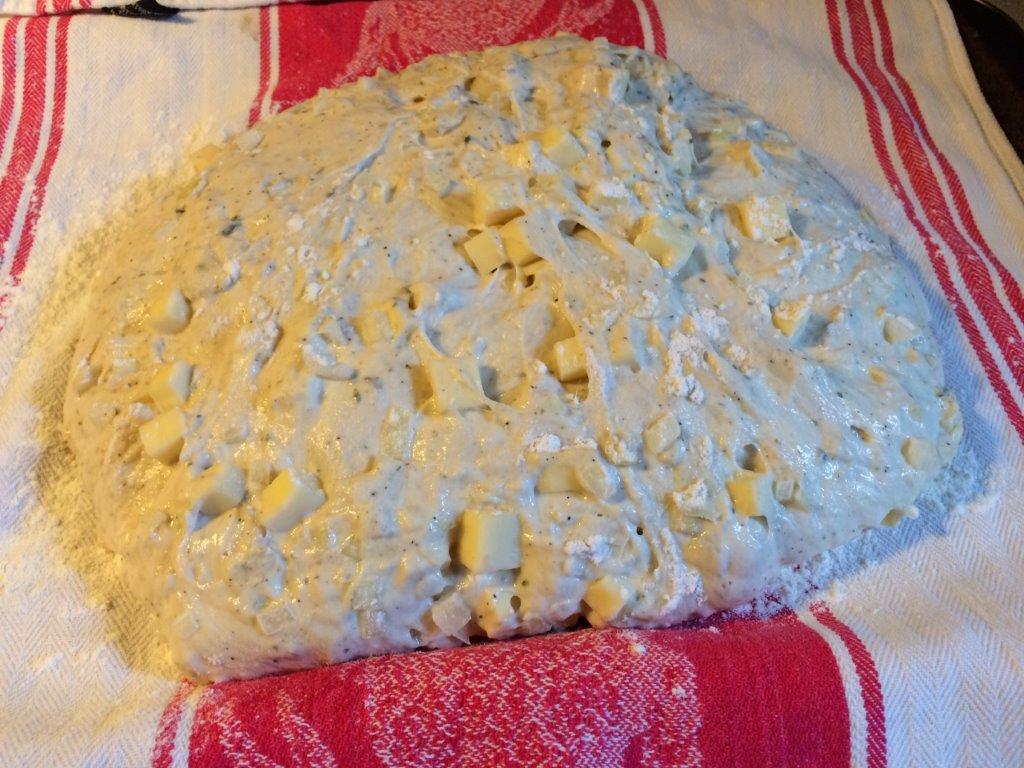
After the dough has risen, generously sprinkle the counter with flour. Also, lay a dish towel (I use the same one that was covering the bowl) across a baking sheet with the ends hanging off the sides. Sprinkle the center of the towel with corn meal or more flour and gently rub it into the towel.
Turn the dough out onto the floured surface. Flour your hands, then make two folds. First, fold the left and right sides towards the center. Then fold the top and bottom towards the center. The folding action is similar to folding a letter to put in an envelope.
Transfer the dough, seam side up, on to the dish towel. Fold the ends of the dish towel over the dough to cover it. Set it aside to rise for another 1 to 2 hours.
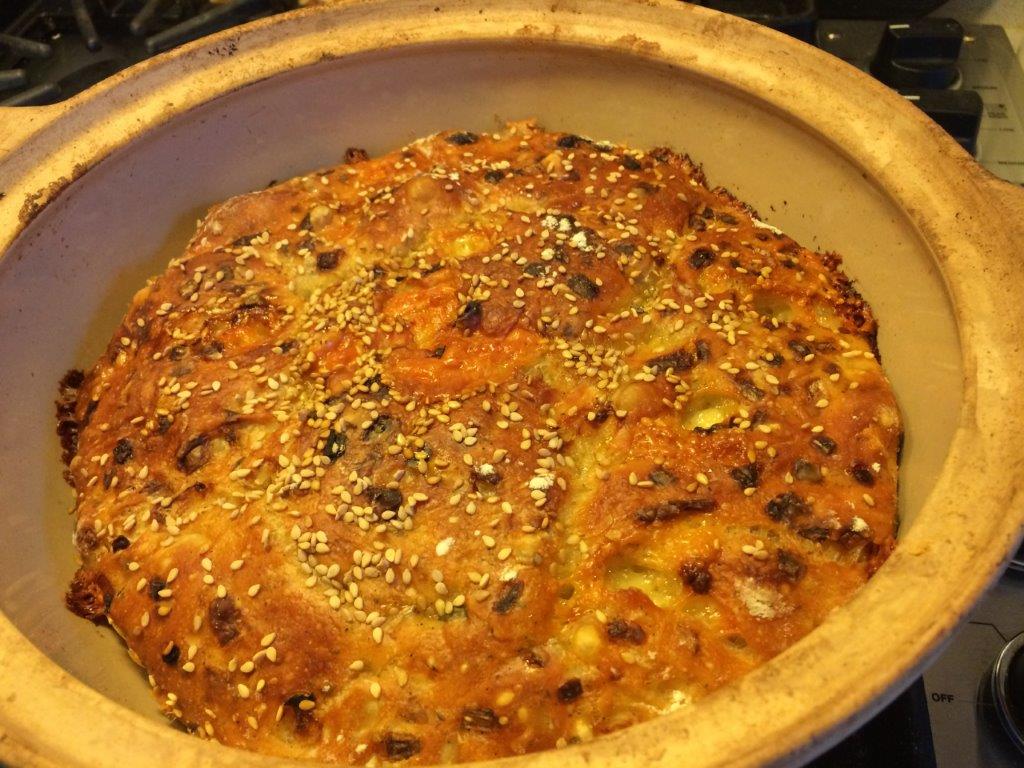
Thirty minutes before the end of the rising period, place a large and heavy covered Dutch oven or bread dome or cloche (I use this one) into the oven, and preheat to 475F. After 30 minutes, carefully remove the hot vessel from the oven and transfer the dough to the pot, keeping the seam side up. If the dough doesn’t land neatly, using potholders, shake the pot to even it out. Sprinkle the sesame seeds on top.
Replace the cover and put the pot back in the oven for 30 minutes, then remove the lid and bake for another 20-30 minutes, until very brown. You don’t want it to burn, but the longer you go, the crisper the crust will be.
Transfer the loaf to a rack to cool. You should hear it singing as it cools.
p.s. Now that I feel like I have my feet under me in 2016, I’m aiming to share one non-cooking-club-related post with you every week. Let’s see how I do!

Cottage Cooking Club: January 2016
In northern climes, cooking vegetables in the winter can get a little dull. For someone who tries to keep to seasonal vegetables, in the months when nothing is growing outside, the choices are mainly root vegetables and various crucifers. As much as I love most of these vegetables, especially roasted, I can also get bored.
One of the percs of cooking with the Cottage Cooking Club is finding inspiration in the seasonal selections made by our leader Andrea, The Kitchen Lioness, from Hugh Fearnley-Whittingstall’s vegetarian cookbook River Cottage Veg. These ideas are helpful to making the dinner table more exciting, especially this time of year.
Because the other eater at my house doesn’t enjoy the flavor of curry, I limited by choices to two of the recipes. I also threw in a makeup. In no particular order, here’s my review.
The first thing I made was the Rutabaga (Swede) with Onion and Sage. Cubes of rutabaga are slowly sautéed with onions, which caramelize during the long cook. Once the rutabaga is tender, the dish is strewn with chopped fresh sage. I’ll admit that I struggle to enjoy this particular vegetable (turnips, too). Though the onions were sweet, the rutabaga itself didn’t sweeten quite enough for me. Roasting does a better job of that. I did like the flavor combination, so perhaps I would add onions when next roasting rutabaga and finish it with sage, being inspired by Hugh’s recipe even if I don’t repeat his version.

Next I tried Squash Stuffed with Leeks. The problem with winter squash is that sometimes it’s sweet and flavorful, and other times it’s bland and mealy. There doesn’t seem to be any way to tell just by looking at the vegetable. I had some dumpling squash that I’ve been storing since late fall. Unfortunately, it fell in the bland and mealy category. On the other hand, the leek filling was delicious! It reminded me of the topping for leek and cheese toasties that we made back in August. The filling didn’t turn the stuffed squash into a hit, but it did make the whole thing edible. I was disappointed that the squash didn’t pull its weight. I may try this again some time, or try to figure out something else to stuff. I can’t blame Hugh’s recipe for my mealy squash. Certainly, the presentation was pretty even if the overall taste didn’t match up.

Finally, I made the Pizza with New Potatoes and Blue Cheese, a choice from June 2014. One of the supermarkets near me sells frozen wood-fired pizza crusts. I used one of these rather than making my own crust. If you plan ahead and have the ingredients on hand (cooking the potatoes ahead of time), this pizza accompanied by a green salad is a quick and delicious weeknight supper. The caramelized onions with garlic and rosemary provided a sweet foundation for the bland potatoes and piquant blue cheese. I enjoyed Hugh’s version of white pizza (i.e. no tomato sauce).

February’s vegetables at the market won’t be much better than January, so I’m looking forward to Andrea’s choices for next month to liven things up. In the meantime, check out my fellow Cottage Cooking Club member’s blogs to read their reviews of January’s recipes. Maybe you will be inspired too!
