Category Archives: Baking
A Slice of Memories
One of my husband Howard’s best memories is living around the corner from the Gourmet Ghetto in Berkeley, California back in the eighties. The primary fixture in that food lovers’ neighborhood was (and still is) The Cheese Board, a cheese store/bakery cooperative that sells an amazing array of cheese and bakes fabulous breads and pastries. Howard’s favorite thing to come out of the bakery was the cheese bread. Whenever we pass through the area, we stop for a fix of cheese bread and cheese.
Because we live on the East Coast, stopping by The Cheese Board isn’t a frequent occurrence. To satisfy the cheese bread craving, I’ve come up with a homemade version that Howard says comes close to what he remembers. It’s easy enough that I try to make at least once a month.
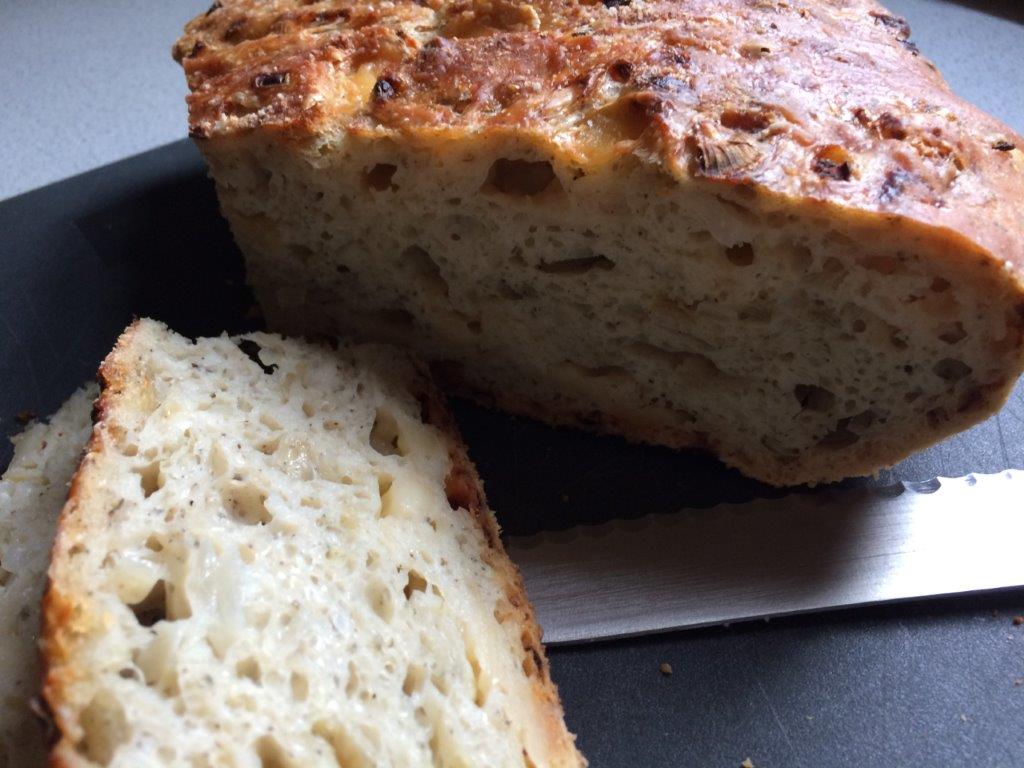
This time of year, slices of cheese bread are the perfect accompaniment to a bowl of soup for lunch or dinner. The crusty outside, speckled with flecks of almost-burnt cheese, contrasts with the soft inside, studded with more pockets of tangy cheese. The floral aroma of marjoram adds a lovely savory element.
Give it a try. If you ever visited Berkeley, you might be transported. If you didn’t, I still guarantee you a bread you’ll want to eat again and again.
No-Knead Cheese Bread, inspired by the Cheese Board in Berkeley
Adapted from Jim Lahey’s No Knead Bread and The Cheese Board’s cookbook.
(Note that I use a scale, but I’ve included approximate volume measurements.)
400 g (about 3 cups) bread flour
½ – 1 tsp fine sea salt (depending on how salty the cheese is)
¾ tsp yeast
2 tsp dried marjoram
½ tsp freshly ground black pepper
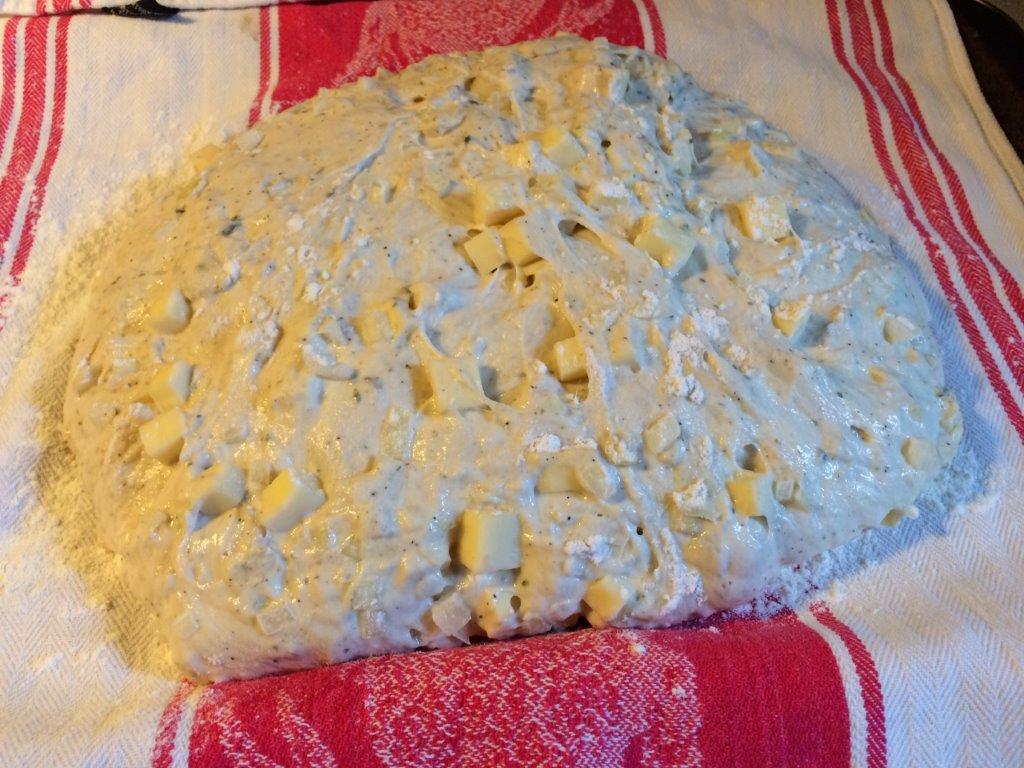
1 onion, diced
200g Asiago cheese, diced into ½-inch pieces
About 360 g (about 1-5/8 cups) water
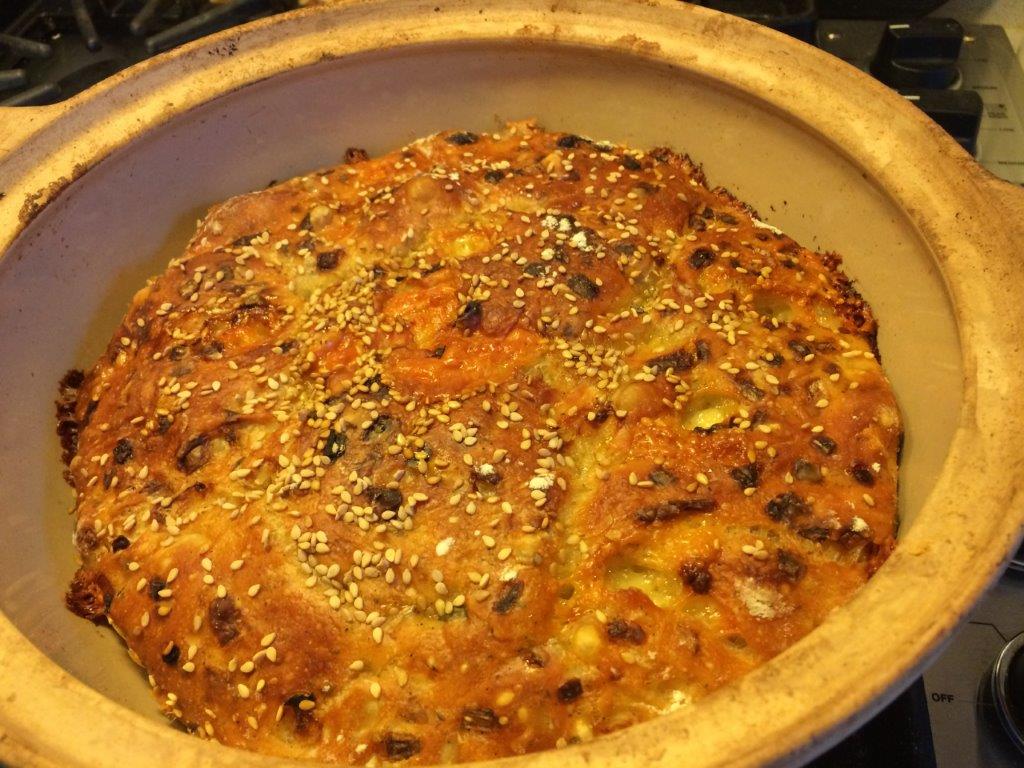
2 Tbsp sesame seeds (to top the loaf before baking)
In a large bowl, whisk together the flour, yeast, salt, marjoram, and pepper. Add onion and cheese and stir to evenly distribute them throughout the dry mixture.
Slowly add water, stirring to combine, until you have a fairly wet dough where all the water is incorporated. You might not need all the water, or you might need a little more. I stir in about half of the water, then another half of what’s left, then judge how much more I need.
If the bowl is really sticky, transfer to a clean bowl. Cover the bowl with a clean dish towel and set in a draft-free spot. (I sometimes use my microwave or the oven.) Let it rise 12-18 hours. It can go a little longer if that suits your schedule better. The dough will rise, get bubbly, and remain very sticky.

After the dough has risen, generously sprinkle the counter with flour. Also, lay a dish towel (I use the same one that was covering the bowl) across a baking sheet with the ends hanging off the sides. Sprinkle the center of the towel with corn meal or more flour and gently rub it into the towel.
Turn the dough out onto the floured surface. Flour your hands, then make two folds. First, fold the left and right sides towards the center. Then fold the top and bottom towards the center. The folding action is similar to folding a letter to put in an envelope.
Transfer the dough, seam side up, on to the dish towel. Fold the ends of the dish towel over the dough to cover it. Set it aside to rise for another 1 to 2 hours.
Thirty minutes before the end of the rising period, place a large and heavy covered Dutch oven or bread dome or cloche (I use this one) into the oven, and preheat to 475F. After 30 minutes, carefully remove the hot vessel from the oven and transfer the dough to the pot, keeping the seam side up. If the dough doesn’t land neatly, using potholders, shake the pot to even it out. Sprinkle the sesame seeds on top.
Replace the cover and put the pot back in the oven for 30 minutes, then remove the lid and bake for another 20-30 minutes, until very brown. You don’t want it to burn, but the longer you go, the crisper the crust will be.
Transfer the loaf to a rack to cool. You should hear it singing as it cools.
p.s. Now that I feel like I have my feet under me in 2016, I’m aiming to share one non-cooking-club-related post with you every week. Let’s see how I do!

Inspirations In Ink: Teatime in Paris!
 I love tea and I love Paris. It wasn’t until I started reading through the new book “Teatime in Paris!” that I received from its author Jill Colonna that I was introduced to the teatime custom in France. I knew about British teatime, but I have always thought of France as a coffee drinking nation, never realizing their culture included a time and place for tea. In France, this late afternoon treat is known as le goûter.
You know how you seldom see a fat French woman? Jill explains that this because the France is not a nation big on snacking. Eating is done at mealtime, but teatime is a secret “little meal” time: a break before dinner, when you can enjoy a cup of tea with a small pastry, guilt-free.
On the one hand, “Teatime in Paris” is a cookbook that offers recipes for an assortment of Parisian teatime pastries: éclairs, macarons, tartlets, cookies and more. In each recipe, Jill explains each step in a clear voice with helpful photographs, erasing the intimidation that some of the seemingly more complicated recipes induce. Tea pairing suggestions accompany each recipe. I love it!
In addition, this book is an armchair tour book. As you explore the recipes in the book, you also go on a virtual tour of patisseries in Paris, arrondissement by arrondissement with Jill leading the way. She tells you about the pastry shops that inspire the recipes shared in the book, allowing you to dream of your own Parisian teatime.
The book start off with the simplest teatime treats: madeleines, financiers, cookies, and other assorted treats including other little cakes, ice cream, and crepes. The Mini Tigrés, tiny chocolate-speckled cakes topped with a dab of ganache, are adorable. And who can resist anything with speculoos, so why not Speculoos Ice Cream?
Next, you’re introduced to pastries made from choux dough. Choux pastry is the base for éclairs and other sorts of cream puffs. Each one, offering a different combination of pastry shapes, filling, and topping, range from the classic to the imaginative. For one thing, you can make waffles with leftover choux dough. And with lemon verbena growing in my herb garden, I plan to try the Lemon and Verbena Mini Éclairs.
This brings you to a chapter of tartlets (my favorite kind of French treat). Again, different flavors of pastry crust are combined with different fillings for a mouthwatering selection of tarts, both individually and full sized. There are several recipes to make use of the best of summer’s fruit, but I look forward to ripe figs in the fall for Fast Fig, Almond, and Lavender Tart where puff pastry is topped with frangipane, sliced figs, and dried lavender blossoms.
Have you always wanted to try to make millefeuille, those impressive towers of flaky pastry sandwiched between pastry cream, at home? Jill lets us in on a secret. It’s easy to make millefeuille at home if you start with frozen puff pastry! Different flavors of pastry cream and maybe some fruit and you can easily enjoy homemade millefeuille.
Jill has a blog (and an earlier book) called “Mad about Macarons”. Therefore, it’s no surprise that the chapter on macarons is the most extensive. It also inspires confidence. Again, Jill’s instructions are accompanied by step by step photos to guide you through making your own macarons in your kitchen that rival those on offer at a Parisian pastry shop. There are also ideas to vary the shape to make “Maclairs” (in the shape of éclairs) or even to imitate a Paris-Brest with its traditional tire shape.
Ingredients in this book are measured by weight, which is the French way. If you haven’t gotten on the bandwagon yet, go buy yourself a digital scale. Measurements are so much more predictable when the ingredients are weighed, and there are fewer dirty dishes.

Diamond Biscuits
I baked a batch of Diamond Biscuits (Diamants), a “slice-and-bake” version of shortbread. The cookie dough log is rolled in granulated sugar which adds the sparkle that gives these their name. Two or three of cookies with a cup of tea make a perfect pick-me-up in the late afternoon at my own Parisian teatime, at home. You can try them too. One tip: if you chill them longer than 25 minutes, you might need to let them sit at room temperature for a little while before rolling the log in sugar so that the dough is soft enough for the sugar to stick. In this case, additional baking time might also be required. Go by the color, not the time.
Diamond Biscuits (Diamants)
Recipe from “Teatime in Paris!” by Jill Colonna
125 g butter, softened
45 g granulated sugar
½ tsp vanilla extract
150 g all-purpose flour
Mix the butter and sugar until light and creamy, either using a balloon whisk or in a stand mixer with the flat (paddle) beater. Add the vanilla extract and gradually add the flour. Keep mixing until the batter forms into a ball. (At this stage you could add a different flavor such as cinnamon.)
Roll the dough out onto a floured surface, ensuring you roll it as round as possible into a sausage, to about 3 cm (1¼”) in diameter. Roll in cling film and chill in the fridge for 25 minutes. Meanwhile, preheat the oven to 180C/360F.
Once chilled, roll in granulated sugar, then cut into 1 cm-thick (approx 3/8″) discs. Place them on a baking sheet lined with parchment paper or a silicon mat and bake for 8 minutes or until golden.
Serve with Lady Grey tea or Darjeeling (the champagne of teas)
Shaping Tip: To keep your sausage shape round in the fridge, without a flat side, roll in cling film and place it on top of a plate covered in rice.
Each time I page through this book, I savor my little visit to Paris, and I’m filled with inspiration.
A Plateful of Happiness Rating: 4 plates (out of 5)
I received this book from Jill Colonna for this review. The opinions expressed are my own.
