Category Archives: Autumn
Personal Parmentiers {CtBF}

I LOVE casseroles! Surprisingly, I didn’t discover them until I became a college student and cooked in my dorm with other people and the wide variety of home cooking recipes that we shared. I’m excluding all forms of baked pasta from the category of casseroles as my half-Italian mother was a master of lasagna and baked mac-and-cheese.
As I learned many years later, when asking why she didn’t make casseroles, there were two reasons, one from each of my parents. The first was that my father did not like leftovers. Casseroles being a creative way to reuse leftovers, he was onto that game. The second was that my mother didn’t like her food mixed together. Most of my childhood meals are what I call “three position dinners”: meat, starch, and vegetable, arranged separately on the plate. I had no idea that this was my mother’s preferred way of interacting with her dinner.
I love my food mixed together. One reason is probably because I don’t like to eat that much meat. With it mixed with vegetables and other ingredients, I like to think it’s less noticeable to other people eating what I cook.
Pot pies are a favorite. Good in any cooler weather season, a pot pie is my favorite vehicle for post-Thanksgiving leftovers. The turkey, vegetables, and gravy all get a second life. I’ve always topped a pot pie with pastry or biscuits. In this French version, Chicken Pot Parmentier, a dressed-up pot pie filling is topped with smooth mashed potatoes. It’s kind of like a potpie-Shepherd’s pie mashup, but the filling can’t disguise its Francophile leanings: a dash of wine, a handful of chopped tarragon, miniature onions.
As any casserole requires, I tweaked the ingredients to work with what has on-hand. I didn’t have an open bottle of wine, so used sherry. I had leftover turkey breast, so used that instead of chicken. I couldn’t find pearl onions at the grocery store but used cute little Cippolini onions that they did have. I also quartered them because they seemed too big relative to the diced carrots and celery.

Dueling Pots!
There were a few standout takeaways from the recipe. First, simmering the vegetables in the broth to be used for the velouté sauce was a genius nod to simplicity. I also loved the flavor the wine added to the sauce. The egg yolk added to the mashed potatoes added extra structure that worked well.
This week we weren’t eating many meals at home, so I made only one-third of the recipe (always divide by the eggs) and made two individually-sized Chicken Pot Parmentiers. They were adorable and just the right serving size for each of us. No leftovers from the leftovers!

I’d definitely make this again, full-size or maybe divided into more individual servings, depending on my mood. Chicken Pot Pie amped up a notch or two into French comfort food. This is a winning recipe.
Want to make this yourself? You can find the recipe on page 166 of David Leibovitz’s My Paris Kitchen. Want to know how other renditions turned out? Follow the links of my fellow home cooks from Cook the Book Fridays here.
Bon Appétit!
Extending the Tomato Season

It’s been almost a week and fall is officially here! I don’t know how the weather knows, but as soon as the calendar hits the first day of fall, a chill arrives in the air. Apples, squash, a multitude of root vegetables are on their way. It’s your last chance to put up some tomatoes for a burst of summer in the colder season.
I’m an active volunteer at Lexington Community Farm. At their Harvest Festival last weekend, I put together an informational table on preserving vegetables and did a demo on canning salsa. Prior to preparing for the demo, I’d never canned tomatoes before. They have a reputation of being risky to can but this is undeserved. Tomatoes can be canned safely and easily.
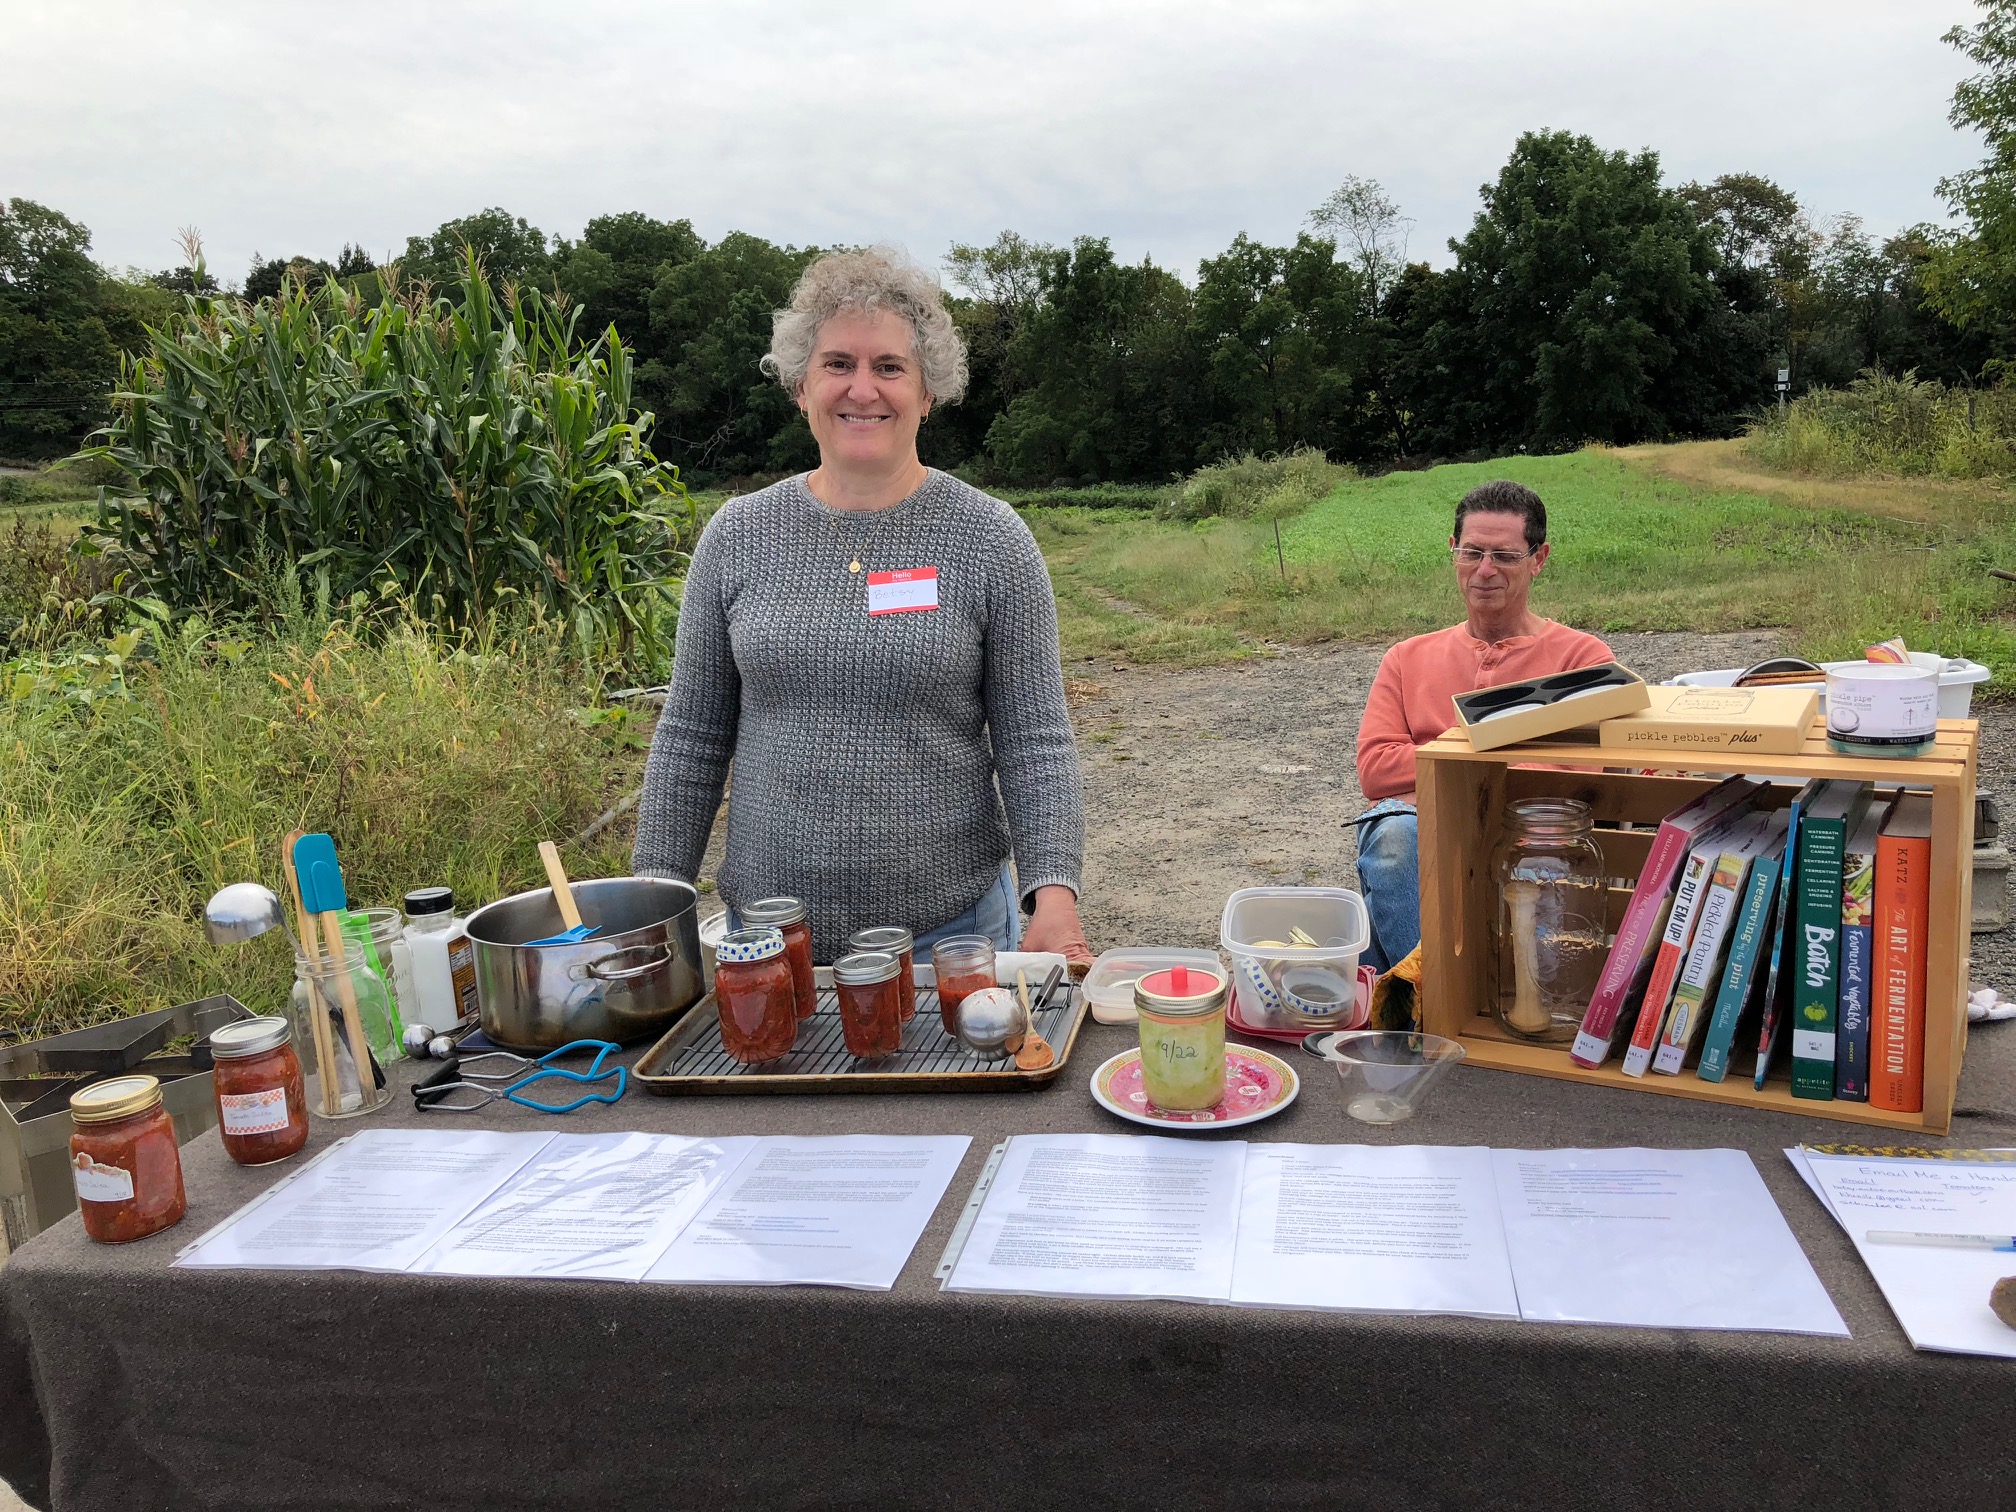
Canning
Tomatoes can be canned in many forms: whole tomatoes (or halved or quartered), salsa, tomato sauce, tomato soup.
Anything canned in a water batch canner must have a pH of 4.5 or lower (high acid) to be safely canned. Because tomatoes are considered “low acid”, it is very important to include enough acid in the jars to prevent food-borne illnesses like botulism.
Most sources discourage using fresh lemon or lime juice. Vinegar, bottled lemon or lime juice, or citric acid are the recommended choices because they have a known, predictable acidity. When canning tomatoes, you should only use recipes that have been tested for the proper acidity. This isn’t the time to wing it.
Recipe: Tomato Salsa
Yield: About 3 pints
1 cup distilled white vinegar
¼ cup sugar
1 Tbsp kosher salt
3 pounds tomatoes (whatever kind you have), seeded and diced (no need to peel)
½ pound onions, diced
1-2 jalapeños, finely diced
1 cup cilantro leaves, chopped
Sterilize jars for 10 minutes in a water bath. Wash the lids and place in a heatproof bowl. Pour boiling water over them and let them sit.
In the meantime, in a large saucepan, bring the vinegar, sugar, and salt to a boil. Add chopped vegetables and return the mixture to a boil. Boil for 5 minutes. Add cilantro and remove from heat.
Ladle the hot salsa into hot jars, leaving ½-inch of headspace. Run a chopstick or small spatula around the side of the jar to release any air bubbles. With a damp paper towel, wipe the rims of the jars to remove any salsa that landed there. You need a clean surface for a good seal. Place a lid on top of each jar and then screw a jar band onto each jar.
Place jars back into the canner and return the water to a boil. Once the water is boiling, process the jars for 15 minutes. Turn off the heat, remove the lid from the canner and let the jars sit for 5 minutes. Remove the jars to a rack or a baking sheet lined with a dish towel. Let them cool undisturbed for 24 hours.
Check the seals. The lids should no longer be popped up. If a jar did not seal, store it in the refrigerator and use it first. Label jars with the date. Sealed jars can be stored in a cool, dark place for about a year.

Basic Canning Equipment:
| Canner | Any pot, with a lid, that is tall enough to cover your jars by 2-3 inches. |
| Rack | You want the water to circulate around the jars, so the jars should not sit directly on the bottom of the pot. If you don’t have some sort of rack, you can make one by lining the bottom of the pot with extra rims from the traditional two-part lids used in canning. |
| Canning Jar Lifter | When canning, the jars are hot. Canning tongs are essential for safety. They are shaped to hold the jars firmly when moving hot jars in and out of boiling hot water. |
| Wide-Mouth Funnel | This reduces the mess when transferring jar contents to the jar. This has become one of my most used kitchen tools. I use it when transferring any food to a jar for storage, such as flour, sugar, rice, and grains. |
| Lid Lifter (Optional) | A magnetic wand that picks up lids without having to touch them with your hands. |
| Bubble Remover/Headspace Tool (Optional) | One end is notched in quarter-inch increments for measuring headspace. The other end is used to release air bubbles from filled jars (a chopstick can be used for this purpose). |
You can buy a “starter kit” of canning tools which typically includes the jar lifter, funnel, lid lifter, and bubble remover/headspace tool.
General Canning Tips
Always sterilize the jars before canning. Place clean jars on a rack and fill the pot with enough water to cover the jars by 2-3 inches. Cover the pot and bring the water to a boil. Once boiling, start the timer. Continue boiling the water and the jars for 10 minutes. At this point, you can turn off the heat. Leave the jars immersed in the water.
Never reuse the lid of a two-part lid. It won’t seal reliably after its first use. Rims can be reused.
You will want your tools super clean too. I do not sterilize my tools, but I do slip them into the pot of boiled water to sit while I get ready to fill the jars.
You will want to fill hot jars with the hot product. After sterilizing, the jars can sit in the hot water while you finish up cooking what you are going to can. Don’t let the jars cool; they should stay warm. If the temperature differential between the jars, contents and water in the canner is too much, the glass jars might break from thermal shock.
After processing, turn off the heat, uncover the pot, and let the jars rest for 5 minutes. This helps prevent thermal shock on removal from the pot.
Freezing
Freezing is another option, without any hassle. In late summer, I make my batches of favorite tomato sauces to freeze for winter pasta dinners. Nothing special is required for safe preservation. You just need containers and space in the freezer.
Whole tomatoes can be frozen in freezer bags or other well-sealed containers. You don’t have to peel them first. Remove the stem scar, wash well, and dry, then pop them in a freezer bag. You can start a bag and add more tomatoes to it as you pick extras. When using frozen tomatoes, the skin should slip right off when you rinse them in warm water. You will want to use frozen tomatoes in cooked dishes because the texture will be mushy.
Using the Scraps
When seeding the tomatoes, collect the seeds, surrounding gel and any juice in a bowl. Stir in some salt, dried Italian herbs, and optionally red pepper flakes. Transfer to a strainer set over a bowl and allow the liquid to drain back into the bowl, stirring occasionally to maximize the liquid extracted. Use this juice to make a very light and delicious Bloody Mary.
When you peel tomatoes, you can save the peels and make Tomato Skin Salt. All you need are the peel, coarse salt, and some time to dehydrate the combination. This seasoned salt will extend summer’s flavors beyond the last frost.
Resources
Websites:
Ball/Kerr Canning Jars: https://www.freshpreserving.com/home
Food in Jars blog: http://foodinjars.com/
Well Preserved blog: http://www.wellpreserved.ca/
Northwest Edible Life blog: https://nwedible.com/food-preservation-index/
Books:
Ball Blue Book (a classic)
Books by Marisa McLellan (blogger behind Food in Jars) have recipes for smaller batches. My favorites:
- Food in Jars (2012)
- Preserving by the Pint (2014)
